Friday, 11 January 2019
Disney Princess 3D Paper Doll #3 Tinkerbell
Tinkerbell is a common fairy whose speech resembles the sound of tinkling bells, unless of course you are able to understand the language of the fairies like Peter can. A companion to Peter Pan, it is she who is able to bestow flight to others with her 'starstuff', otherwise known as pixie dust, ultimately allowing Wendy and her brothers to fly with Peter to Neverland.
I know she is not a princess but I wanted a Tinkerbell paper doll that would fit in with my previously made Disney 3D paper dolls of Ariel and Pocahontas. But as Disney does not have a 3D Tinkerbell paper doll available I decided to design and create one myself. For reference I used Pocahontas' sitting figure for the body but I had to design and edit the face, hair and wings myself. She turned out very pretty and a one of a kind because I created her myself.
Friday, 4 January 2019
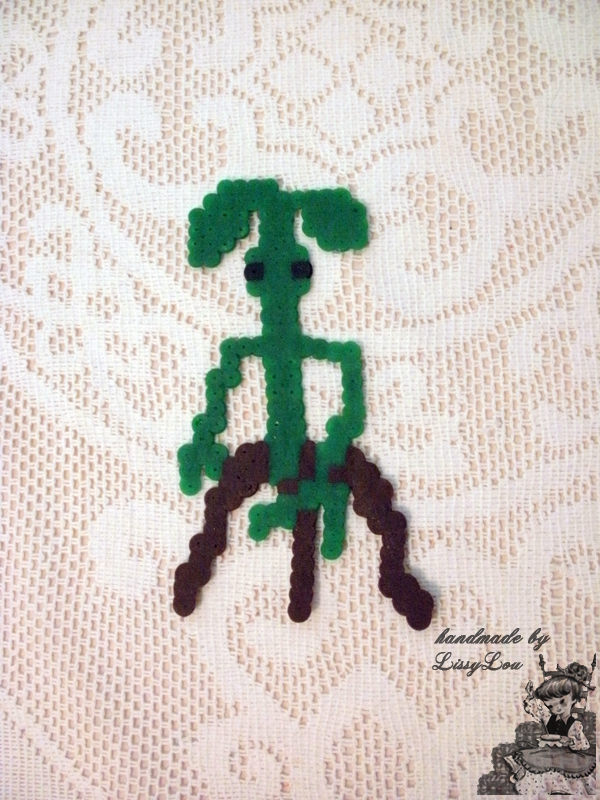
Fantastic Beasts Bowtruckle bookmark & Niffler + Gold Coin Key Chain & Newt's Suitcase Box
Awhile back I made a Harry Potter gift set using iron beads for my nephew, he liked it so much I decided to create a Fantastic Beasts set. As with the Harry Potter set, this set also includes a bookmark, that of a bowtruckle, two key chains, a niffler and a gold coin, and a box, this one made to resemble Newt Scamander's suitcase.
Looking online a found a number of great designs that would be ideal to use for this Fantastic Beasts set, including this bowtruckle design. Using a square 29x29 peg board, the finished design was ironed pretty well flat on both sides to make it as thin as possible so the finished bowtruckle could be comfortably used as a bookmark, with the finished size being about 14.5 cm tall.
These two pieces were also made from designs I found online. There are a large number of niffler patterns that I found and wanted to use, but in the end I chose this smaller niffler to create because it was cute and also a similar size to the gold coin I made to accompany him. The actual key chain part is handmade by me using yellow rope, jewellery endings, jump rings and a lobster clasp.
For this Newt Scamander suitcase box I used the same box design that I created to make Harry Potter's school trunk box, only with a few modifications. I did think about changing the size and dimension slightly to better represent a suitcase, but in the end decided against it as it would be too slim to use a box. However, I think that the box looks quite good as a suitcase.
For this piece I decided to keep it a plain brown, with the exception of the black for the suitcase corners. I then added most of the yellow pieces to complete this suitcase box. These pieces include the large Newt Scamander 'NS' initial logo that I attached to the lid, the four pieces that I attached to the back as studs, and the two pieces that I attached to the front for the locks.
These yellow front pieces also cover the two magnetic closures I attached to this box, giving it a seamless look when closed while also providing a secure lid. The two suitcase pieces, the lid and base were then attached together at the back in two places with strong thread to create the hinges. The finished suitcase size is about 5 cm tall, 12 cm long and 7 cm wide.
I love the look of this Fantastic Beasts set. I am especially proud of the Newt Scamander suitcase box, as well as the previous Harry Potter trunk box, as I designed and created the whole thing from scratch. All of these pieces were made using iron beads, also known as perler, hama or pyssla, along with a 29x29 peg board. I do love these types of crafts and hope to make more in the future.
Friday, 28 December 2018
Topsy Turvy Doll mini - Doll & Sailor Mars
I was in such a hurry to get these last few dolls wrapped that I forgot to take a photo of this topsy turvy doll with both heads showing, like I have for my previous topsy turvy dolls. So I instead had to edit the picture above to give you an idea of how these dolls look together, not that you will usually ever see both dolls at the same time being flip doll.
This particular doll is a gift for my sister, I have a few sisters so I have a few dolls I have made for them. As with my other mini flip dolls I used the face template that came with the pattern, that of the traditional happy / sad face. I embroidered black for the eyebrows, black and white for the eyes, a pale tan colour for the nose, then I used red embroidery for the happy lips and a light pink for the sad lips.
The last bit of embroidery was done to the hands of each doll to give definition and create fingers. The hair for each dolls head is made from yarn stitched first in a layer to cover the head, then followed with a second layer to create the length of the hair. This was done to ensure no bald spots on the dolls heads.
I loosely based the ginger haired doll on my sister, as her hair is gingery, and the material for the dress was once a skirt of hers that she gave to me a while back. I like to use recycled materials as opposed to buying new materials and as my sisters tend to donate their old clothing to me for this purpose, so they often find familiar patterns in the items I make them.
This black haired doll is actually based on the sailor scout Sailor Mars, from the amine Sailor Moon, I chose her as she represents the month of my sisters birthday. The hair for this doll was sewn in the same ways as the ginger haired doll, only with the added fringe that Sailor Mars has. The outfit is a simplified version of Sailor Mars' fuku, that is a white top with her signature red skirt, only as I didn't have red material I used a maroon instead.
This mini size topsy turvy doll was made with the intention of it being a display piece as opposed to a play piece, however that dosen't mean that a doll this size is no good for play. This doll measures about 8.5 inches from head to head and about 9.5 inches from head to hem as the skirt hangs a little lower to fully cover the doll under it. As with everything I sew, this flip doll was completely sewn by hand, including the hair and dresses, so as a result these dolls do take some time to make.
Friday, 21 December 2018
Mistletoe 3D
While searching the net I came across this design for a 3D Mistletoe and loved it so much I had to try it myself. Unfortunately I can not remember where I found this or who originally made up this design, but regardless it makes a beautiful decorative piece to hang for this time of year.
This piece is made up of two separate pieces that interlock, sliding together at the stem of the mistletoe. Iron beads such as perler, hama or pyssla were used to make this along with two large peg boards for each piece. To the top of the mistletoe I added two jump rings to thread a ribbon through for hanging.
Mistletoe is not something I have ever seen in real life, but I have always loved the look of it as a Christmas ornament, the simple look of green and white is so pretty. So with this mistletoe measuring 18cm tall, without the ribbon, and 20cm wide, it seemed the ideal size to round out my Christmas decorations.
Friday, 7 December 2018
Mooncalf (inspired by the Harry Potter Series)
Sometime ago I became the adopted mother of a Baby Mooncalf that had been separated from its herd after dancing under a full moon. I had fully intended to insure that this shy little creature was restored to its proper home amongst its own kind on the next full moon. Months later this still had not happened, until finally one night I was able to coax him out into the night. The last thing I expected was to adopt yet another mooncalf. But this is exactly what happened and I couldn't be more happy about it.
At the time of making my first baby mooncalf, over a year ago now, there were surprisingly no patterns available to make this sweet fantastic beast. Even more surprising is that in doing a more recent search, there are still no sewing patterns available to make a mooncalf. So I returned to my original pattern I designed myself. I do think that the first small version I made using this pattern turned out quite well actually.
Back then I designed the pattern by starting with a basic body shape I was happy with, adding to that an extended neck and slightly rounded larger head. The feet were a bit more tricky, in order to get a more webbed like look I used the Cornish Pixies feet as a guide. The shapes for the ears, tail and eyes were easy enough to draw and my pattern was complete. Only for my baby mooncalf I used buttions for the eyes which was a simple alternative for a plush that size.
This larger mooncalf was made in the exact same way and with the exact same materials as my first. The only exception to this is that for this larger mooncalf I instead sewed the eyes on using needle turned appliqué, the eyes were then also stuffed a little to give them a more round shape and a black safety eye was added to the centre of each for the pupil. This larger mooncalf was also given a mouth, something I did not do for the smaller version as it would have been too fiddly.
The baby mooncalf I made previously was only 4.5 inches tall, but this larger version is exactly double this size measuring 9 inches in height. This larger sized mooncalf made the job of turning out the feet so much easier then it was with the baby mooncalf, as seen by comparing the feet of each below. I also really like the wide eyed look of the larger mooncalf as it stares of into the distance in search of moonlight.
While I am very pleased with the pattern I created and the two mooncalf creatures made from this pattern, I am a little sad that there is not a bit more love in the world for this adorable yet shy creature. Newt Scamander's text Fantastic Beasts and Where to Find Them does not do these majestic creatures justice, however their appearance in his suitcase has seemed to create greater appreciation for these lovely, shy beasts.
Friday, 30 November 2018
Cuddle Pillow Toy - Kitty #2
This fat cat pillow toy is another gift I have made. I loved this purple fabric I had and just had to use it paired with the same pink accent fabric I used for the first Kitty Pillow Toy I made. As with my first kitty, this kitty also has eyes that are pink coloured safety eyes, the whiskers and mouth embroidered in black using backstitching and a pink nose, blanket stitched in white, that is also the same pink fabric as its ears.
This cuddly Kitty Pillow Toy is the perfect size standing at roughly 9.5 inches tall, not including the ears, and about 8.5 inches wide, not including the paws, making this colourful kitty the ideal size to cuddle up with, or fall asleep on if desired. This kitty also has a long tail measuring just under 12 inches long. The pattern for this, along with many other toys can be found HERE in the Shiny Happy World shop.
Friday, 23 November 2018
Plush Rodent
This cheeky little critter was made from another vintage pattern I happened across. He stands about an inch taller then the Beanie Rodent I made and as you will see he is also a lot wider, so I decided to instead stuff this fella in order to accentuate his shape, instead of using plastic pellets like I did for the Beanie Rodent and My Beanie Mouse.
The pattern for this actually recommends using fur fabric which I think would have looked great, however as I use only recycled materials and I had no fur fabric this is what I came up with. I used the white on the belly and in the ears to contrast with the darker maroon colour of the body and tail, black was used for the paws, embroidered nose and safety eyes and a pink tongue completes this plush.
The total height, including the ears, is about 13.5cm, so he is quite a comfortable hand held size, and with a tail 19cm long, he is also quite comfortably swung about, not that I'm actually in the habit of swinging him by his tail. Front on this critter is about 6.5cm wide, however as seen in the picture below, he is much wider side on measuring closer to 10cm.
I love finding old vintage patterns that are not commonly used any more but are still cute and unique, like this little critter. I think a larger more cuddle friendly version of this would make such a great gift for little ones. In the meantime this little fella will join the Beanie Rodent and My Beanie Mouse on my increasingly crowded bookshelf.
Subscribe to:
Posts (Atom)