Friday 31 August 2018

Magizoology Wallpapers set1 - Garden Gnomes [or Warrick In The Wild]


A few minutes down the road from where I live is a beautiful national park where I occasionally go bushwalking. I don't go nearly as often as I would like, but on my last outing I noticed that I wasn't as alone as I had thought I was. It seems that Warrick, my garden gnome, had decided to follow along and its looks as thought he had quite a time exploring his new surroundings.

I decided I should make some desktop wallpapers of Warrick in the wild. These wallpapers are size 1366x768, which is the size of my own computer, but if other sizes are wanted I can make those too. To download click on the picture of the wallpaper you want and "Save Image As" to save to your computer or alternatively you can select "Set As Desktop Background". Hope you enjoy.


Friday 24 August 2018

Even More Garden Gnomes (inspired by the Harry Potter Series)


One of my favourite magical creatures to never appear in the movies, but who do make an appearance in my garden, are the Garden Gnomes. I so love these grumpy faced little creatures and have made it my mission to see that that they find fun new homes. This is not the first time I have written about these adorable beings, the first time being back in February of last year, the second time only a month after that.


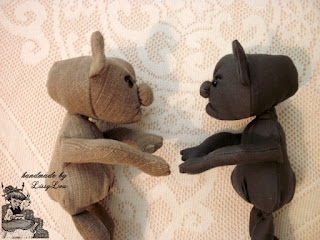
My first garden gnome was Warrick who, seen above on the left, still spends most of his time indoors and on my bookshelf, despite the fact that it is now winter here in Australia and I'm sure his gnomehole in my backyard would be just as warm for him as my house is freezing. Next to Warrick is a new friend, as yet unnamed as he is to be re-homed with a new family.


The reason for a new garden gnome post, other then the fact that I just love these creatures, is to show the difference materials can make when creating one of these gnomes. Using the one pattern these two gnomes have slightly differing sizes which is all due to the material used. Warrick was made from an old pair of jeans and his little friend was made from left over heavy curtain fabric.


If you decide to make a garden gnome yourself, details for which can be found here, the in-depth tutorial attached advises suede cloth, or any non woven fabric. However I prefer to use materials I have on hand and unfortunately I had no suede when making these. The jeans used to make Warrick were, I thought, a great light brown/tan colour and the material had some stretch to it which made it easer when turning inside-out.


This second little garden gnome was made with a heavier dark material, leftover curtain scraps, that had no stretch to it at all which I discovered made a bit of a difference when it came time to turning out his sewn pieces. It was especially tricky turning the hands the right way out as it was a smaller piece to manoeuvre and the material was also thicker then I was used to, but I found a pair of hemostats came in handy for this.


I have also made a few sets of Blue garden gnomes, complete with Weasley's Wizard Wheezers scroll's that I have previously given away seen here. But I find no mater the material used or the colours chosen for these magical creatures they are each so adorable and such fun to toss about. To get this pattern for yourself visit Tiffany Hinnen (aka. Mieljolie) etsy store HERE, and to find out more about her other macical patterns and creations visit her blog All Things Crafty.
Friday 17 August 2018

Poison Ivy Key Chain + Necklace + Hairband


Lately I have been playing around with iron beads, creating a lot of different makes from designs I have found online but also coming up with a few designs of my own. Something that is a mixture of the two is this is gift set I made for a special little someone who is a fan of the DC Superhero Girls, I had also previously made her a Poison Ivy & Wonder Woman topsy turvy doll seen here.


For this set I used a square peg board and iron beads, also known as perler, hama and pyssla beads. The first piece is a key chain of Poison Ivy that I actually designed myself. She is small, about 6.5 cm tall, which is a cute size for a keyring. Once she was designed and ironed together I added a jump ring and a cord that I made myself from a waxed green cord, cord ends, smaller jump rings and a lobster clasp.


This necklace was inspired by the flower that is seen on Poison Ivy's belt. The centre flower is from a design I found online, however the vine / leaves were designed by me as I wanted a more statement necklace rather then a plain flower necklace. After the pieces were ironed I connected them with jump rings and then made the chain from a silk green cord, cord ends, smaller jump rings, a lobster clasp and added a few chain links to make the necklace size adjustable if needed.


This last piece, also a flower, was yet another design I found online, however I did have to design the green leaf part myself. After ironing this was hot glued to a plain black head band that I bought from ebay, I actually bought a few of these very cheap. Overall I was very pleased with how this Poison Ivy gift set turned out, I especially liked the necklace which is definitely a statement piece.

Friday 10 August 2018

Sailboat with bonus Sea Star #2


It has been a while since I have posted about my sailboats, the first can be seen here. This is yet another gifted make, and as with the first was intended as more of an ornamental decorative piece but if it got played with some then that's good too. It's always nice to know my gifted makes are being enjoyed. This green version also has its matching sea star or starfish, just as I made for my first blue sailboat.


This sailboat and sea star was made in exactly the same way as my first, only with green materials instead of the blues. I again used two skewers, measured and cut, to create the mast and boom and stitched the sails onto these. The sails and and small flag are made from two pieces of material sewn together, turned inside out, ladder stitched shut, then ironed so as too be strong and sturdy. The body of the boat, along with the sea star, is stitched together, turned then stuffed before being ladder stitched closed, with the boat being stitched closed around the mast.


I used the same pattern to make this sailboat as I used to make my first and found it easier the second time around as I now had an idea of how to make this. The first time I made this there were no instructions with this pattern and I had to figure out for myself what materials to use, such as the skewers for the mast, and how to make it work. The full standing size of this sailboat is somewhere around 12 inches and along with its sea star is makes a lovely gift set.

Friday 3 August 2018

Faery Rag Doll #6 Gnome doll + desktop wallpaper


A new addition to my faery rag doll collection, and another gifted make, is this Gnome doll. Although you may have seen this gnome already in my blogs banner along side my faery rag doll, this is the first blog post about him and as this particular gnome was given away I do feel I need to make another to keep my own faery doll company.


Using the same basic pattern as my faery rag doll, I altered it only slightly to make his shorts and top look as opposed to the faeries all in one dress / body, and also altered the faeries leg pattern to create the gnomes boots. Lastly I excluded the faerie wings and instead made a pattern for the tradition gnome cap.


As with my other faery rag dolls, this gnome doll has black safety eyes, blanked stitched hair and large embroidered ears. The red cap was made separately and was easily removable however I decide to stitch it to the head as this gnome was gifted to a wee child and I didn't want the cap to end up lost.


I so love these little dolls and actually made this last image into a desktop wallpaper sized 1366x768, to download click on the picture and "Save Image As" to save to your computer or alternatively you can select "Set As Desktop Background". Let me know if your having any problems with this or if any other size is preferred.