Monday, 19 July 2021

Hanging Animal Art Doll - Hare

It has been a while since I made one of my animal art dolls. These animal art dolls feature long jointed limbs and a basic body shape. For this hare doll I altered the head shape then created exaggeratedly long ears, a pompom tail and stitched on pink nose. I have also added little pink safety eyes to match the pink features of this hare art doll.

I was actually in the middle of another project when I received the Forest Fae Messages card deck and was inspired to create this hare art doll after pulling 'The Thimble Witch' card. Her message was "There is magic in beginnings, so start something new", and after seeing the hare doll in her lap I instantly thought of my animal art dolls and decided to take her advice. See my review for this deck HERE.


This is a decorative art doll that was totally hand stitched. Made in just one week, that is pretty fast for a hand sewn project from start to finish, fast for me anyway. I also added a loop to the back of the hare's head so this hare art doll is able to be hung, as well as stood on a shelf. But with a full size of about 37cm, I think for now I will keep him sitting on my shelf.

Tuesday, 29 June 2021

Big-Headed Garden Gnome (inspired by the Harry Potter Series)

For the longest time I had wanted to make one of these garden gnomes with a bigger head to better resemble the gnomes that are described in the Harry Potter books, and so after a long time just thinking about it I finally I got around to making one and I love him.

This garden gnomes pattern has been a favourite of mine for a long time, you can see some previous gnomes I have made HERE, HERE and HERE. Almost all of these gnomes have since found new homes, but this big-headed gnomes stays on my shelf, when he isn't roaming around the garden.

HERE you can see the original gnome made from this pattern on the right and the beg-headed gnome on the left. I used the exact same pattern for both, they have the exact same body, arms, legs, nose and ears. I even used the same materials to create these, the only difference between the two is the head size.


To make his big-headed gnome I increased the size of the pattern pieces for the head to 130% before printing. At first I wasn't sure if it would be big enough, then I worried it might be too big. But I actually think it is probably about the right size and because his body is weighted with stuffing pellets he isn't at all top heavy with a bigger head.

This big-headed gnome is only slightly taller then the original standing at a little under 11 inches tall, and is finished with the same safety eyes as the first gnome I made. Both are so very cute, I cant decide which one I like more. As I said, this is such a great pattern, to make a gnome for yourself you can visit Tiffany Hinnen (aka. Mieljolie) at her etsy store HERE.

Monday, 21 June 2021

Yule Beads - Wheel of the Year

Pictured above are all 8 seasonal beads for the Wheel of the Year. At the bottom is these 8 beads are the Yule beads and as it is now Yule in the southern hemisphere these are the beads I am featuring. You can read more about Yule and how I use these beads HERE.

In making these Yule beads I went through my supply of beads and see what I could use. The colours for this season were obvious, red, green and white, so they were the colours I went with, only I used pearl beads instead of white. All up there are 46 of these red, green and pearl beads, not including the green amazonite stone spacer beads.

Monday, 17 May 2021

DIY Ogham Stones


Previously I made a set of very basic Ogham staves, I called them staves but really they are just a bunch of wooden nail cuticle pushers that I drew the Ogham figures onto. But for what they are, they aren't that bad, just not the prettiest looking. I still intend to create a more proper set of Ogham staves from sticks at some point, but as I had a bunch of these nice little stones on hand I thought why not make a set of Ogham stones.

The hardest part about making these Ogham stones was just finding enough stones that were of a similar size, shape and colour. These stones actually came from my garden, so I luckily didn't have to go to too much trouble to find these. I find it's always nice when you can use materials that you have on hand as opposed to buying too many supplies and materials.

These stones have a natural shine and smoothness to them that is lovely to hold and are a size that is comfortable, especially when grabbing a handful of stones at one time. To create these Ogham stones, I firstly made sure these stones were cleaned and dried, I then simply used a permanent black pen to draw on each Ogham figure. I did try using a gold then a silver pen for these, but the Ogham figures did not stand out very well due to the light colour of the stones. You can read more about using these Ogham stones HERE.

Monday, 26 April 2021

Samhain Beads - Wheel of the Year


I spent some time last year creating these seasonal beads, 8 in total, one for each turn of the Wheel of the Year. Here in the southern hemisphere it is almost Samhain, so these are the beads I made for this festive season. You can read more about this HERE.

To make these Samhain beads I first decided on the colours for this season, black, white, silver, gold, purple and orange. I then had to go through my supply of beads and find colours I had, so I ended up using 46 yellow, purple and gold beads, not including the obsidian stone spacer beads.

Sunday, 4 April 2021

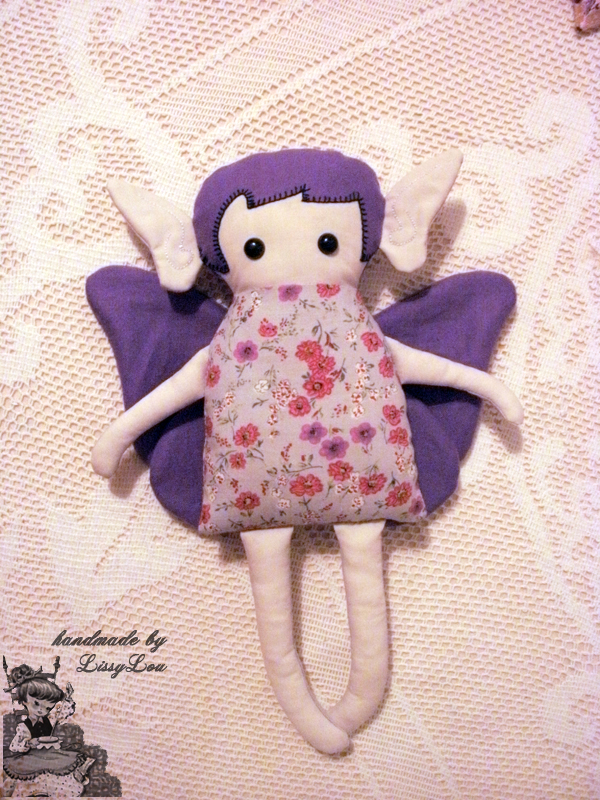
Faery Rag Doll #8


It has been over a year since my last post about my faery rag dolls, so I was well overdue to create another of these simple and sweet magical dolls. This lovely purple faery was a special order and I am glad to say she has settled into her new home quite nicely.


As with all these hand-sewn faery rag dolls she has black safely eyes, a blanket stitched fringe and detailed pointy ears. The full height of these dolls is about 24cm from head to toe and the full wingspan is about 16cm. I will have to get back to making more of these magical little dolls.

Thursday, 25 February 2021

DIY Ogham Staves


For the past few months I have been trying to learn all about oghams. A very complicated and messy subject, due to the little facts that are actually known about oghams. The only concrete information about the oghams comes from the actual name meanings and the associations of the Bríatharogaim Kennings found in the Ogham Tract. However, there is plenty of opinion and speculation as to what the oghams represented and how they should be interpreted. 


Although there are some consistencies to be found among the many sources I have researched about the the meanings and associations of the oghems, there are still many others that differ or contradict what is found in other sources. Even the names of the oghams themselves have differing spellings. This becomes all the more complicated when you reach the last five ogham fews, which were a latter addition and for this reason not always discussed among literary sources.


To aid my learning I decided to create a physical set of oghams staves. My intention was to create a set from sticks, however as I have yet to procure the sticks I need, and because I had them on hand, I have created an ogham set from wooden nail cuticle pushers. I still intend to create a set from sticks, but for the moment these diy staves will do. They are wood and about the right height I wanted, just a little too skinny. All I needed to do was draw on the ogham figures and I was done. You can read more about using these Ogham staves HERE.